There a handy Rop for TDs and pipeline folks called “Shell,” It’s pretty great and allows calling to the shell to run systems commands… but we are not going to use it, well not so much as intended, but going to take advantage of a peculiar feature.
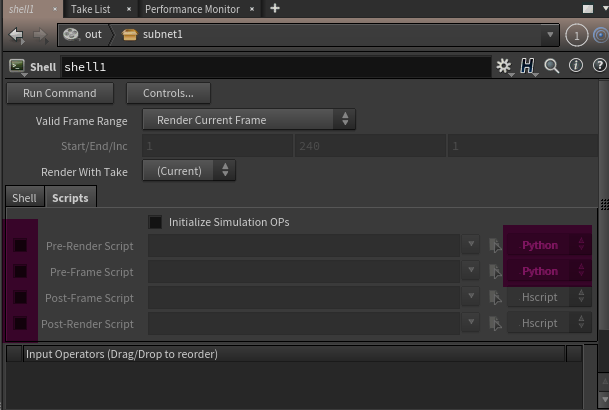
In the Network Graph, while still inside our working subnet, drop a Shell node. When you look at the Parm Pane you will see options for running Unix/Shell command. Leave this alone. What is interesting is when left blank it still executes the pre and post commands.

In the Parm Editor, click the Scripts Tab for the shell node. This is the place of interest. We are going to leverage the preframe and prerender parms to run our python. (It could also be the post equivalents, as it before and after running nothing essentially.)
- Change the Pre-Render and Pre-Frame Script Languages to Python.
- Switch toggles on the left to off.
**NOTE Next is parm linking and working with both our working Python Rop subnet and the interior shell Rop parms. I often find this easiest with 2 Parm Panes open. If using the Build desktop, a new tab can be created over the network pane, and both pinned (or linked depending on settings) or you may choose to have floating Parm Panes or dive in and out of the Network. However for clarity I will be showing these panes side by side.

The left Python Rop, the right will be the Shell Rop.
The content of the Python Code Field needs to be accessible to prerender and preframe parms on the Shell Rop. This is easily done with a channel reference. It will be referenced in both places as they are mutually exclusive and we want to be able to easily switch between them on the Python Rop UI.
RMB on Python Code Label on the Python Rop Working Subnet, (where we had dragged from on the Python Sop), RMB → Copy Parameter. Then on the Shell Rop, first in the Pre-Render Script field, enable the field and RMB→Paste Relative References. Do the same for the Pre-Frame Script.
**NOTE We can also see the sensible boiler plate we added earlier now appears in the Python Code field.

The integer menu added earlier, is going to control the selection of Pre-Render or Pre-Frame. On the Execute When Label, previously created on the Python Rop, RMB→ Copy Parameter.
If you recall the 1 Value is for “One Per Frame.” 1 implies on and can be used to enable the Pre-Frame Script Field. On the Shell Rop parms, Pre-Frame togglebox, RMB→Paste Relative Reference. Make sure to do this on the togglebox and not the adjacent label. It will highlight green, and if you have both Parm Panes open you can change the int menu to turn on and off the Pre-Frame Script execution on the Shell Rop.
The inverse is needed for the Pre-Render Script. The int was value 0 for “Once Per Render”, which would disable it when chosen, as it did for Pre-Frame Script. Lets get the same starting point by RMB→ Paste Relative Reference on the togglebox for Pre-Render Script.

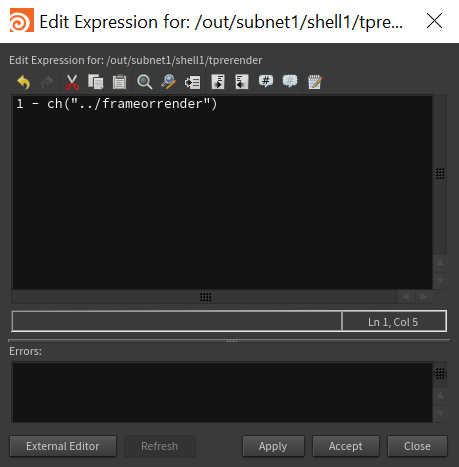
To invert it. RMB again on the toggle box and select Expression→Edit Expression. The expression editor will open. Simply Prefixing this chanref with 1 will create the opposite effect as before. This should be fairly obvious as 1-1=0 and 1-0=1.
Press Accept.
You should now be able to change the menu on the Python Rop and see these alternate fields on the Shell Rop enable in a mutually exclusive fashion keeping to the menu selection.
In the Network Graph, select the Python Rop and RMB→ Save Node Type
Changes are now committed to this new HDA. Time to test. Select the Python Rop and in the Python Code Field enter
print hou.pwd()

Open a Python Shell and Press Render Button on the Python Rop. If all is well there will be output in the python shell. Success!… or is it?
Something has happened. It is printing ‘shell1’, the interior node name to the Python Shell. That is because it is where the script is actually executing. Unfortunately, unlike some other nodes there is no easy way to set the execution path. Since this is not obvious, it is best to go back to our default boiler plate grab the correct node so its obvious and easy to use.
- In network Graph, on Python Rop, RMB → Type Properties
- In middle Existing Parameters column select Python Code.
- On Right Parameter Description column make select the Channel Tab
- In first field ALT+E to get to our default editor or type in the field directly (add a carriage return ie \n if you do).

Add this bellow previous boiler plate comment:
node = hou.pwd().parent()
Save and Close your text editor. This will now have boiler plate where the typical node variable points to the expected place, hopefully to clear up any confusion, since it isn’t obvious.
On Type Properties Dialog, Press Apply.
**NOTE If the script in the Python Rop’s Python Code field did not update to new boiler plate. On Python Code Label RMB→ revert to defaults

Enter on the python Rop Python Code field, beneath the boiler plate add”
print node.path()
Press Render.
Success! You should now see the proper path to the Python Rop.
Some Finishing Touches. Its best to have descriptive errors. Currently we may see an error like “there was an error on shell1” – this isn’t very useful. It is best to have these errors “bubble up” to out top HDA to be easily seen.

- Type Properties Dialog should still be open, if not, then open it from Python Rop.
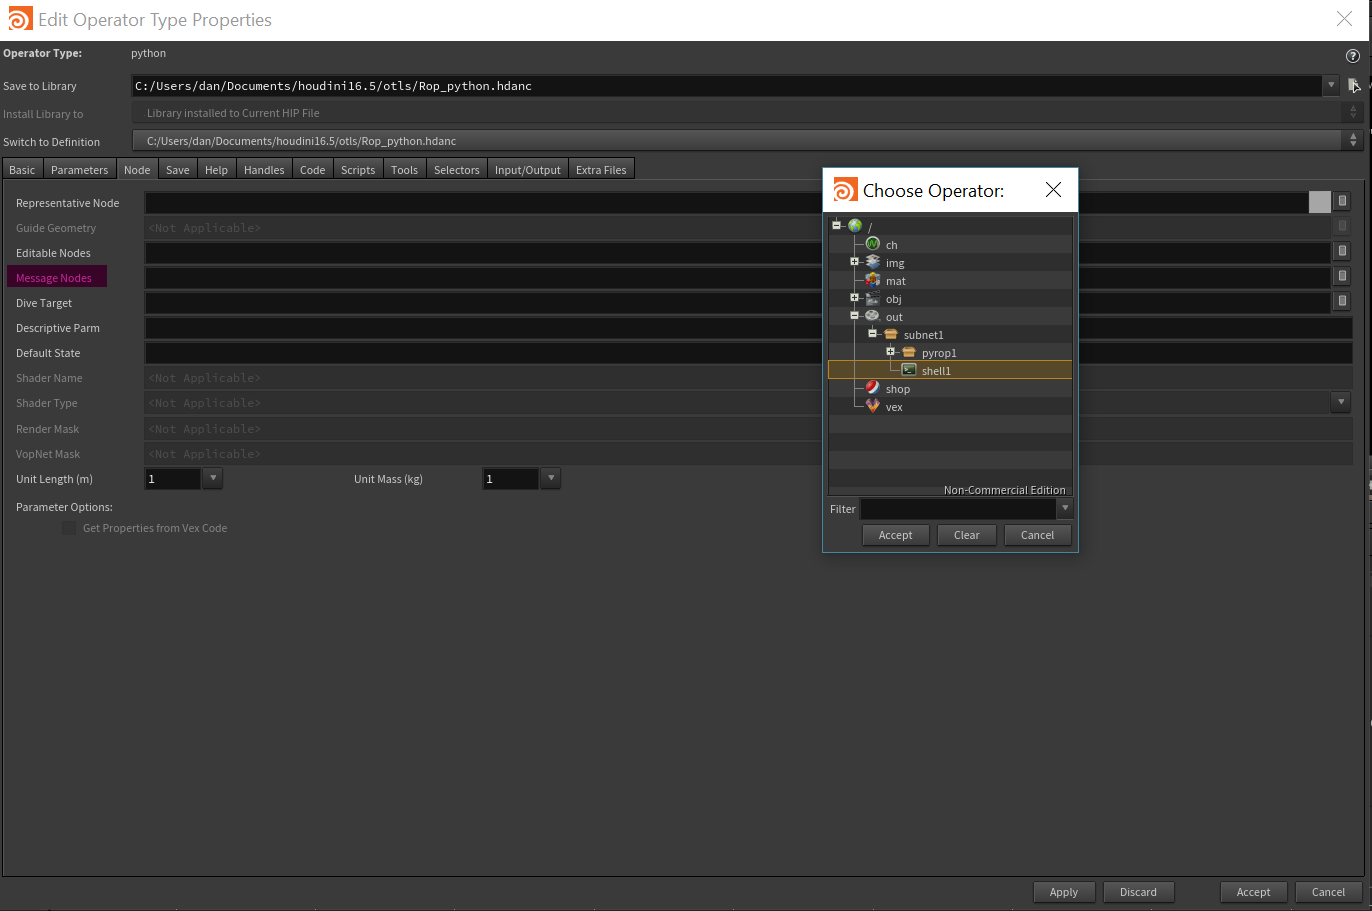
- Go To the Node Tab
- Click to browse button to right of Message Nodes, and select shell1 and accept.
- On Type Properties Dialog, Press Apply.
For some extra polishing, I downloaded a python logo SVG (with proper usage rights) and embedded it into the operator, via the Node Tab of the Type Properties Dialog.
That about it. Hopefully this was useful as a HDA building tutorial or for some tricks for advanced users. Head over to downloads to grab a copy of the finished HDA
Happy CG’ing
(|:-D>
