SIGGRAPH 2013

Status

I will be at SIGGRAPH Sun-Thurs for those that want to meet up my contact info is available on my main site www.dansportfolio.com

Sorry for the late postings, I have run into a bit of unexpected work hours on some productions but there will be lot of good stuff coming soon (|;-D>

Status

I have been busy this winter in a several step move hopefully keeping me in Montreal making good CGs for some time. Hold tight as I prepare an in-depth series of advanced posts and library addictions the next couple of weeks.

As I haven’t had a chance to decide the best way to deal with comments that are %99.9 spam, I have had to shut down commenting for the moment. For the few people that have posted legit comments I do appreciate the feedback and feel free to email me as I do still want to hear it, just not links to replica merchandise and grey market pharmaceuticals.

Congrats to the SESI crew on another release full of surprises tools to help make the Magic happen with H12.5 I haven’t had time to verify compatibility of EVT pys, so any that find hiccups, please do email me.

Happy CG’in (|;-D>

TnT: Viewport Gradient: part 2 — How

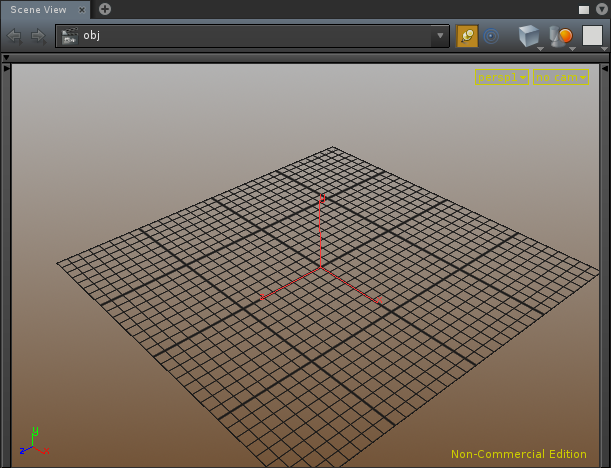
H12 viewport gradient

H12 viewport gradient

In $HOME/houdini12.x add a directory “config”, if it does not already exist. Next, the Houdini installation location is needed to grab the config file of lower path precedence and edit a copy of it. If you are unsure of the install location do any…

  • from inside Houdini, windows menu -> shell
  • source houdini_setup to get a proper environment
  • use the Houdini Command Line Tools in windows

whichever prompt you now have simply enter echo $HFS if in *nix or echo %HFS% if in windows.

** NOTE ** Windows users may get a slightly funny looking value such as… C:\PROGRA~1\SIDEF~1\HOUDINI~1.101 –this is a legacy DOS 8.3 FAT name or DOS SFN — What this means and why it exist is beyond the scope of this post, but suffice it to say, if too difficult to decipher actual location, simply put the SFN into the windows explorer address bar and [ENTER] and it will resolve to the actual location.

Now that the intallation folder is known, copy from installed path/houdini/config/scheme file to $HOME/houdini12.x/config/scheme file
replacing “installed path” with your installation path, “scheme file” with either 3DSceneColors.wb (if altering Dark) or 3DSceneColors.bw (if altering Light) and 12.x with 12.0 or 12.1 (most likely works in earlier versions but is untested).

Somewhere along the line (or maybe I hadn’t initially noticed) the ability to set two viewport colors snuck into these files. Lets take a look inside, but 1st close Houdini. Open the scheme file copy made in $HOME/houdini12.x/config in a text editor ie kate, gedit, wordpad etc … The scheme files contains many options and most are pointless to change, as changing one tends to lead to changing another to keep the color scheme from becoming a mess, so best to start with those below adjusting others only as needed. We are interested in:

BackgroundColor:               0.70 0.70 0.70  # background color
BackgroundBottomColor:   0.45 0.33 0.22  # background color at bottom of viewport

at the top of the file control the gradient, and further down ….

GridColor:                           0.10 0.10 0.10  # reference plane

.. .as noted, controls the grid color, which in most cases will also need to be changed to keep it from getting lost in the gradient colors.

If editing Light scheme you might be surprised to learn it already has a beyond subtle gradient. Feel free to play around with the RGB float values, but remember to save and restart for changes to take effect.

Through experimentation, the brown gradient shown can be achieved with…

BackgroundColor:               0.70 0.70 0.70  # background color
BackgroundBottomColor:   0.45 0.33 0.22  # background color at bottom of viewport

or for a nice fading blue …

BackgroundColor:               0.70 0.70 0.70  # background color
BackgroundBottomColor:   0.14 0.28 0.75  # background color at bottom of viewport

and in both cases I altered the grid to have it stand out as …

GridColor:                           0.10 0.10 0.10  # reference plane

That should about do it. If you want two gradient themes you can override both the light and the dark themes. If you mess up or a lot of warning get spit out on Houdini load, you can always copy a fresh version of the file back to $HOME/houdini12.x/config and give it another go. Happy customizing!

TnT: Viewport Gradient: part 1 — What and Why

This post is the first in “Tips and Tricks” (TnT), so pretty basic and no scripting required.

A recent 3D app trend is to have the viewport gradient shaded instead of a solid color ala Mudbox. Wouldn’t it be nice if a similar viewport effect could be toggled on in Houdini ?  Fortunately, Side Effects provides a solution although the GUI is absent. Not to worry, a few simple steps and a basic text editor like can have provide this nicety.

Houdini provides detailed config options, largely done with text files. If you know your way around *nix, it’s likely a familiar configuration option.  These files come in many forms including XML, JSON, name-value pairs. Some,  such as menus, append or alter files of lower precedence in the path with the same name while others override. If this sounds a little confusing, it’s just provided as background for those interested. For single user environments (and most multi-user) the highest precedence configs reside in $HOME/houdini12.x/config. No scripting ability needed to follow along, and the files that will be edited will override lower one completely.

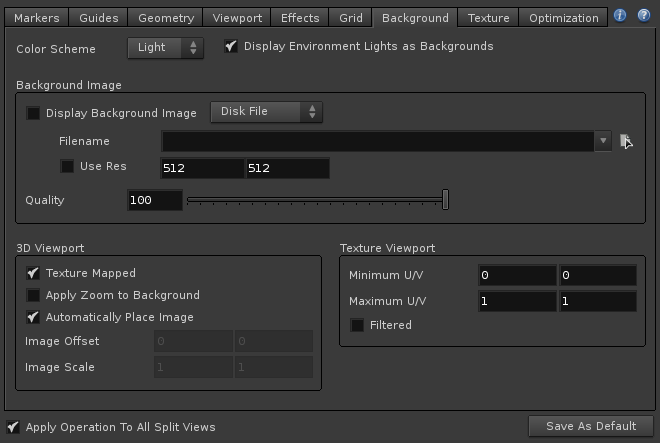
H12.1 Viewport display properties

First inside Houdini, mouse-over a viewport on a scene/context tab press ‘d’, to bring up the viewport display properties, then go to the background tab. There’s a “Color Scheme” menu with options for “light” (grey) and “Dark” (black).  Unfortunately, although the reason isn’t clear, there is a limitation in that there can only be these two schemes — One (or both ) will have to be sacrificed for the new gradient, so best to pick the one least used. Another limitation (if anyone knows otherwise please email me), unlike the GUI color scheme there is no way to force refresh it without restarting Houdini. But don’t restart yet.

** NOTE ** I had previously employed a more complicated alternate method for the gradient that lacks these limitations, but introduced other drawbacks. If theres an interest I might write a follow up post, but suffice it to say the ease and simplicity of the method outlined here tends to make it preferable.

** NOTE ** As the modification alter the default schemes, and this is a configuration tip, there is no download included.

The next section will detail a few easy steps to get this viewport customization.


Another Bulk Post

Status

In the future I will be trying to post one part in a series at a time — we shall see if this works out. As, obvious from the last two series, I tend to accumulate the whole thing before refining and posting it all, but this does leave a bit of editing to do at once.

I will be going to siggraph and hopefully getting some ideas of some simple things to post towards the end of the summer.

As always feel free to leave feedback or bug reports about any of the posts or tools, thanks for reading.

Looking Through: part 6 — Whats Included

This series of posts looked very closely at Camera and Light node types and how to write a function that does its best to determine likely matches to the viewport transform matrix in order to determine what object node is being looked through.

The functions described are now included in ui.py 0.2.0 and ui.py is now included in eyevexTools 0.4.0 with the usual comments and doc strings. As an extra convieniance the following function were added, simply calling viewportObjects() with various flags set….

  • viewportLights() – additionally flags off all camera types
  • viewportCameras() – additioanlly flags off all light types
  • viewportStereoCameras() – only stereocam and stereocamrig are flagged on
  • viewportStereoCameraRigs() – only stereocamrig is flagged on
  • viewportMonoCameras() – only camera is flagged on

Hopefully after reading this series a custom function could be easily built similar to viewportObjects() by calling viewportObjectsOfType() for your own custom camera or light types as well.

I would also like to thank James Fisher Lighting Guru for verifying some lighting practice info for these posts.

….Thats about wraps this up. As usual, if you have questions, feedback, or bugs found drop me a message.
(|;-D>

Looking Through: part 5 — Narrowing

The base function constructed in the first part of this series of posts takes a tuple — node_types to pull the instances and perform the matching. The last two sections went in detail on the types that will be searched for and why the defaults can be expected to be flagged on or off to avoid the most false positive results and remain the most useful. Below the new function and args are introduced…

def viewportObjects(

light=1,
hlight=1,
envlight=0,
indirectlight=0,
cam=1,
stereocam=1,
stereocamrig=1,
ignore_ipr_cam=1
):

 If the last two sections were looked at these args and defaults should be of no surprise. The one exception is the last arg, ignore_ipr_cam, which will be explained in a moment.

Each arg’s flag is tested and the type append to a list, that eventually gets used as an arg for the base function. ie…

# check for light if flagged
if light:node_types.append(‘light’)

After all the flagged on types are appended…

# look for matches
viewport_objects = list(viewportObjectsOfType(node_types))

There is a hidden camera node /obj/ipr_camera which will match the viewport transform. If you need to see it to believe it, go to the network editor, press CTRL+L and paste /obj/ipr_camera into the address bar and you will be inside the ipr cam node. Whenever we flag on cam as a type we are looking for, it will give us a false positive result, so we need to remove this from the results. As it is of a desired type, the easiest was it to check the name against ‘ipr_camera’.

# remove ipr_cam if flagged
for obj in viewport_objects:

if obj.name() == ‘ipr_camera’:

viewport_objects.remove(obj)
break

Lastly when there a results, they are returned as a tuple.

if len(viewport_objects) > 0:

result = tuple(viewport_objects)

return result

And thats about it! It should now be clear on how to construct a usable function that return a light/cam matching the viewport transform matrix. The last section will look at what included in the download module and what is incorporated into eyevexTools.

Looking Through: part 4 — Cameras

In the last post the many represented lights were looked at in terms of their actual operator type and relationship to transforms and the viewport. This post will look a cameras in a similar fashion. The camera type selection is much slimmer and consists of …

  • camera of type cam
  •  stereo camera of type stereocamrig
  • stereo camera template of type stereocam

**NOTE** The names as per the GUI compared with the node type can be a little confusing. Similar to Light being of type hlight and light templates being of type light, the stereo camera is of type stereocamrig and NOT stereocam which is the type for the template.

stereocamrig includes a stereocam inside that is the same transform as the rig. Likewise, the center camera inside is transformed via stereocam and also has the same transform. Unlike three_point_light, only the top level of the Stereo Camera appears in the viewport pull down menu. However, the cameras internal to the asset can be looked through via dragging them onto the viewport. This makes the results somewhat ambiguous as any of the center cam, stereocam, and stereocamrig will all return as matches. When calling the narrowed version of viewportObjectsOfType() the appropriate flags will need to be set depending on if the result being looked for is a sterocamrig or individual cam. As an alternate method, all can be left on an the result sifted through.

Next the narrowed function will be constructed to return cameras and lights with the argument default logically set a described in this and the Lights section.

Looking Through: part 3 — Lights

There are several lights that appear both on the shelf and via the TAB menu. However, when you look closer, you will immediately notice alot of these are just setting parms differently on the same node types.

  • Caustic Light,Indirect Light, and GI Light are all of type indirectlight
  • Ambient Light is of type ambient
  • Environment Light is of type envlight (so is half of Portal Light and Skylight – explanation below)
  • Light Template is of type light
  • Light, Point, Spot, Area, and Distant are of type hlight ( half of Sky Light is an light too)

Below the various light are examined closer and in terms of how they affect viewport matching…

H12 Shelf Lights

H12 Shelf Lights

light template (light)
Light templates are basic stripped down version of light and according to the docs intended for building up a new light type without having to strip down a light (hlight type) instance.

three_point_light is a great included HDA for a 3-point setup with all the widgets for control. The key, fill, rim and bounce light inside the three_point_light setup are all Light instances and type hlight. Each light in the setup will therefore match properly. However, looking through a three_point_light, is the same as looking through its key light. This is important to note as scripts that use this function should take into account that this difference cannot be discerned.

indirect and ambient lights
Since we are comparing the transform of the light to that of the viewport, we are going to want to check against lights that have controls to position it. indirectlight and ambient types lack these controls. This is logical, as they are indirect, having the ability to absolutely position them via viewport widgets or parms would benefit little. Likewise, it would not make much sense to look through them in the first place as doing so in practice is usually to aim the light and to view what the light ‘sees’. However, as you are permitted to look through indirectlight, we will build in the ability to match them for completeness, although this will be flagged off by default.

envlight
Environment lights only have rotation parms. In the case of a hemisphere this may be particularly useful as well as  ” to orient directional illumination.” But, quick use of these unrotated will result in all coming up positive matches, as their transforms will all be identical and in practice it is less than useful to aim the light by looking through them, although the ability is present. Therefore they are flagged off by default and not considered although they can be flagged on.

About Portal and Skylight
Portal Light and Sky Light are special cases of envlight that drop two top level nodes.

Skylight drops a envlight named “skylight” and also an hlight named “sunlight” — the reason for this setup is not %100 clear, but it is what it is, so it needs to be dealt with it the scripts. There’s a viewer widget attached to the hlight that allows the translation of the sun, but not rotation. The rotation comes from the envlights Sky Environment Tab –> Sun Tab –> Rotate Parms. Changing these results in visible changes to the sun widget on the accompanying node. However, selecting the envlight node shows the viewer widget for rotation, but as per normal rotates the envlight dome a previously mentioned. Yikes! Fortunately when left unrotated, false positives are avoided on the dome by leaving envlights flagged off.  The rotation of the map will still be taken into account via the channel linking to the “sunlight” hlight node, which to be useful would need to be translated away from the origin,and the combo of these two things should produce a unique transform. As, hlights are considered by default, and “sunlight” is still of type hlight there should be usable results by testing against this nodes transform matrix.

Portal Light as provided by the shelf and TAB menus is basically a shortcut to create an envlight with the portal geometry per-assigned. The geometry then restricts the envlight so that it only passes through the assigned object. We can flag on to consider envlights, but the transform that actually is restricting is that of the objects assigned which is arbitrary, so can’t be considered, and additionally can not be looked through Considering envlight will also consider those used for portal light and may not produce the result expected as the envlight it self, as mentioned is at the origin and not useful to look through.

Hopefully this section provided a good overview of the relationship between the lights as depicted via the shelf/TAB menu and their actual type, as well as the default arg flags as will be used in the narrowed function calling the more general viewportObjectsOfType() to be explained in an upcoming post.

Next, a closer look at cameras and their relationship to the viewport.